![]()
AUTOSAR EDitor
Email: red-support@ip-camp.com
Website: http://www.ip-camp.com
Introduction
Welcome to RED
RED is a fully compliant AUTOSAR Editor tool developed by IP Camp Kft.
The supported AUTOSAR meta-model versions are:
4.0.3, 4.2.2, 4.3.1, 4.4.0, R18-03, R20-11
RED is based on the following modern web technologies:
- Electron framework
- AngularJS
- TypeScript
- SpringBoot
- Java
Runtime requirements:
- Supported operating systems:
- Windows 10
- MAC OS
- The desktop app install contains its own Java environment installed
Getting Started
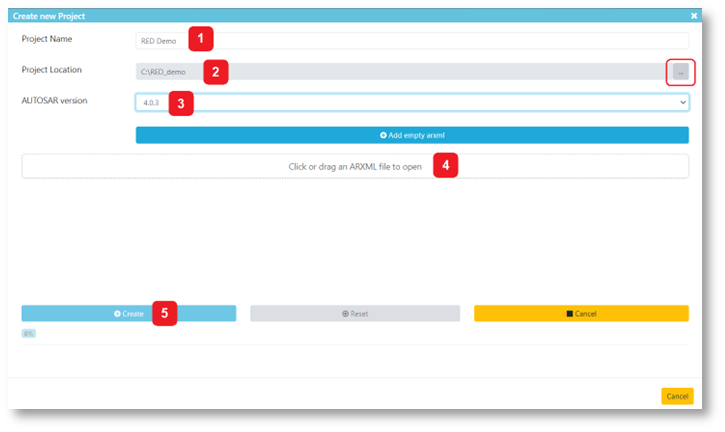
How to create a new project?
Project creation dialog
- Start with typing the project name
- Select a folder for the project
- Select the AUTOSAR version in the dropdown menu
- Add the existing ARXML files to the project (or add an empty ARXML)
- Click create!
Project handling
- A RED project consists of a list of ARXML files describing an AUTOSAR model
- The RED project descriptor is stored in a JSON file with *.red extension
- A RED project can be created based on existing ARXML files and can also be built from scratch
- Any number of RED projects can be open in one running tool instance
- The AUTOSAR standard version will be synchronized for all ARXML files in a project (the version is the property of the project)
- The projects can be managed in the Project browser window
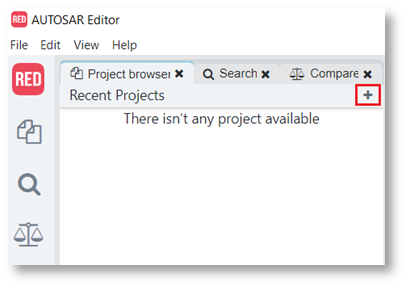
Upon starting RED
- Recently opened projects are listed in the Project browser window
- The state of all projects is closed which means that they do not use any RAM and their content cannot be seen in the model tree
Project management
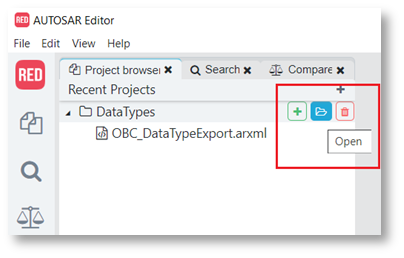
Open project
- A recent project can be opened from the Project browser by
clicking the ![]() icon next to the name of the project
icon next to the name of the project
- A project can be opened from the “File” menu by browsing
the project from the file system (Ctrl + O)
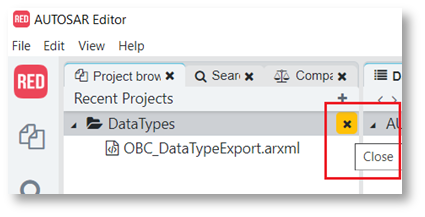
Close project
- A project can be closed from the “File” menu by selecting
the name of the project
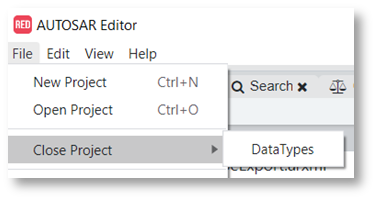
- Or by selecting the
 icon next to the name of the project
in the Project browser
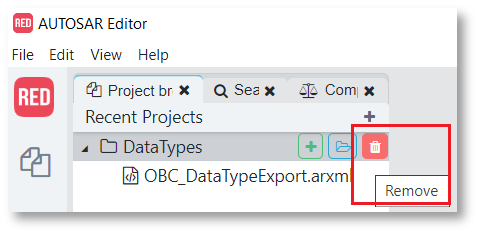
Remove project
A project can be removed from the workspace by clicking the ![]() icon next to the project name in the Project browser (the project should be closed first).
icon next to the project name in the Project browser (the project should be closed first).
Note: The project and the underlying ARXML files are not removed from the file system
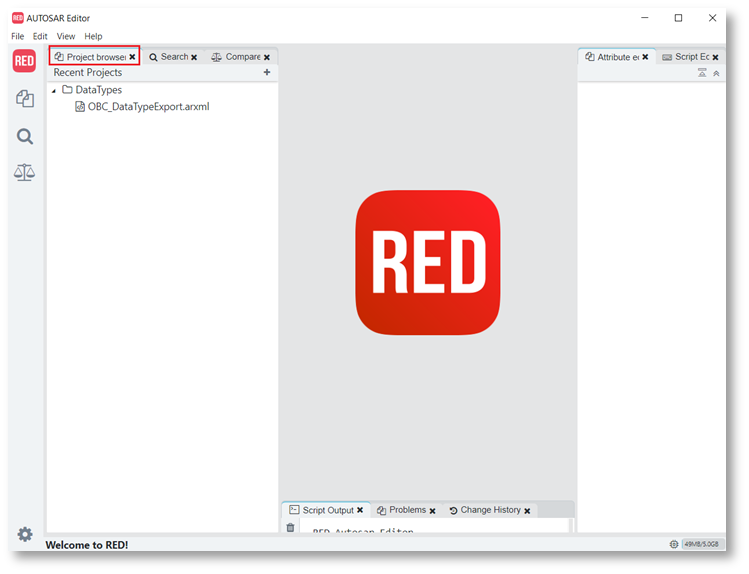
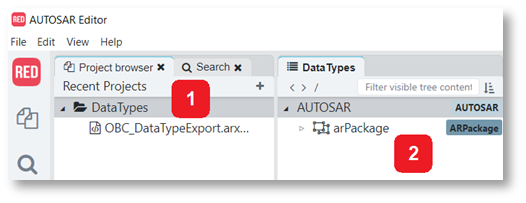
Explore the content of the project
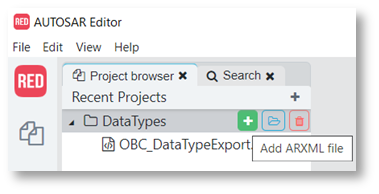
- The new project appears in the Project browser tab with all the added ARXML files listed below it
- The project’s content can be accessed in the tab next to it
Handling ARXML files
Adding an ARXML file
An ARXML file can be added to the project by clicking the ![]() icon next to the name of the project, then browsing the ARXML file from the file system.
icon next to the name of the project, then browsing the ARXML file from the file system.
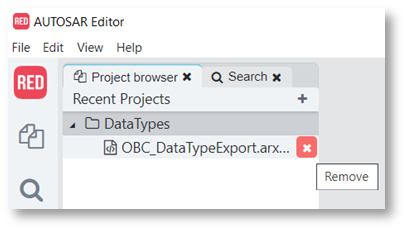
Removing an ARXML file
An ARXML file can be removed in the Project browser by clicking the ![]() icon next to the name of the ARXML file.
icon next to the name of the ARXML file.
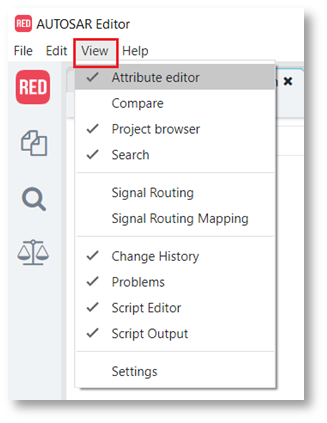
Views
Views to be open are available under the View menu. By clicking either of the views, a tab opens in which the selected view becomes available.
Tree Editor
RED comes with a tree editor which reflects the containment hierarchy of the model. By selecting an element from the tree, the Attribute editor shows its corresponding attributes. After opening a project, its structure is visible in Tree Editor view:
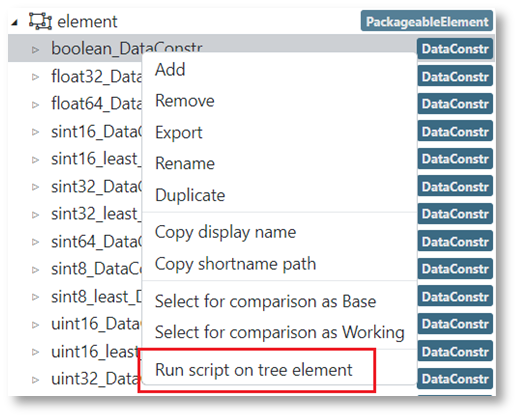
By right-clicking a selected element in the tree, a dropdown menu with editing options appears:
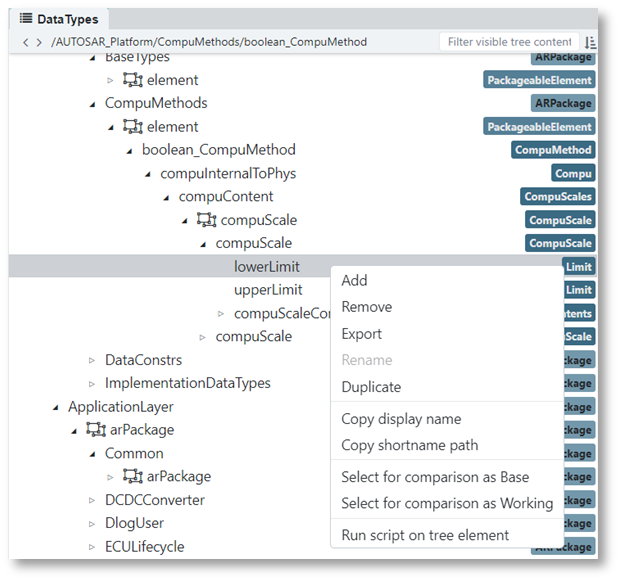
- Add: adds a new element. The element can be added based on the available element types. The Attributes and References can be edited afterwards.
- Remove: removes the selected element from the project.
- Export: exports selected element to a new ARXML file.
- Rename: the name of the element becomes editable (some elements cannot be renamed).
- Duplicate: duplicates the selected element.
- Copy display name: copies the (short) name of a selected element to clipboard.
- Copy shortName path: copies selected element AUTOSAR path to clipboard.
- Select for comparison as Base: selects the selected element for Compare.
- Select for comparison as Working: selects the selected element for Compare.
- Run script on tree element: runs a script on the selected tree element. See later in chapter Running Scripts on a Tree Element.
Script output view
Output of running scripts is shown here.
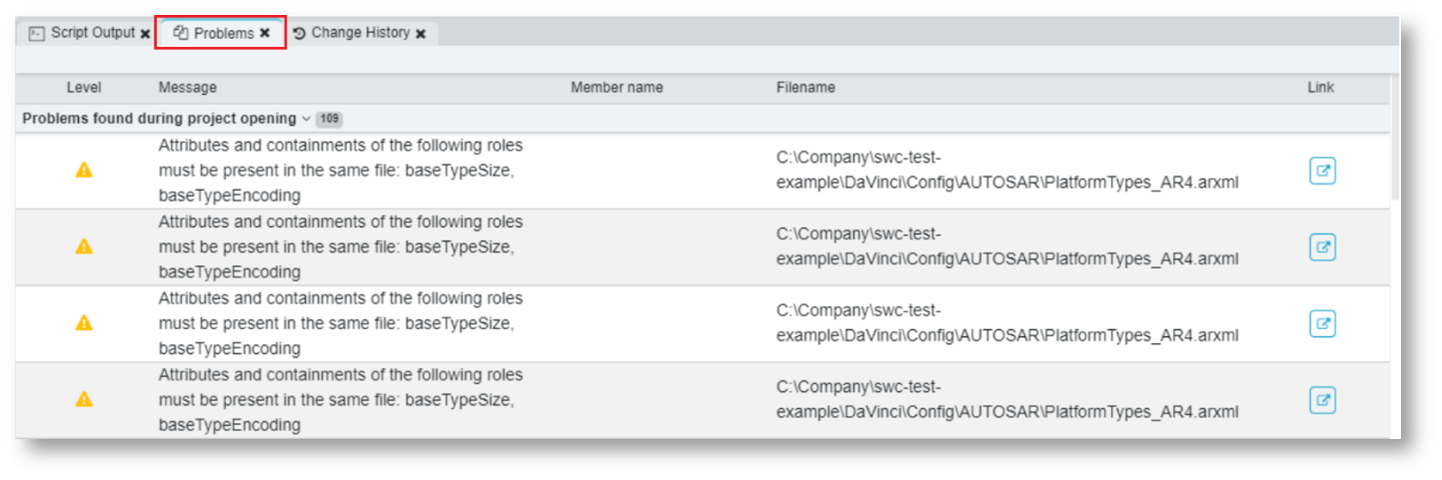
Problems view
The Problems Tab shows a categorized list of errors and warnings for the active project with link to related attribute.
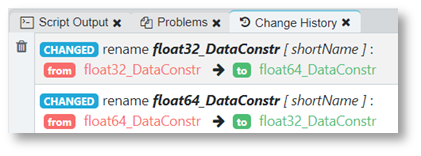
History view
The History Tab shows a list of changes for the active project:
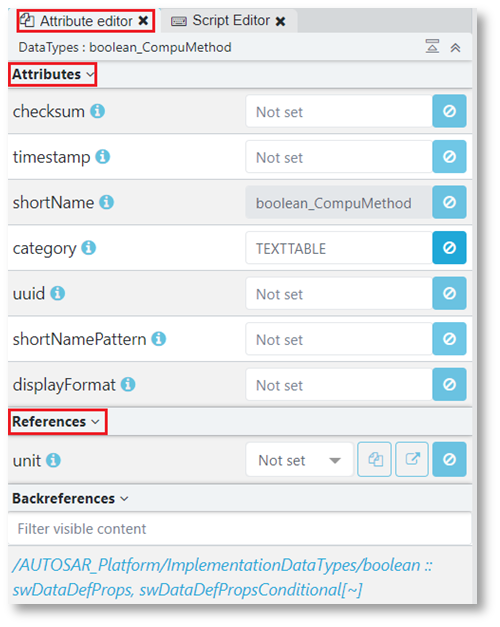
Attribute Editor
The Attribute editor panel gives the user the ability to view and modify attributes of the model element selected in the Tree. By clicking an element, the Attribute editor shows up on the right-hand side. All attributes associated with the selected item will be listed in the menu, with the name on the left and the value on the right.
Features
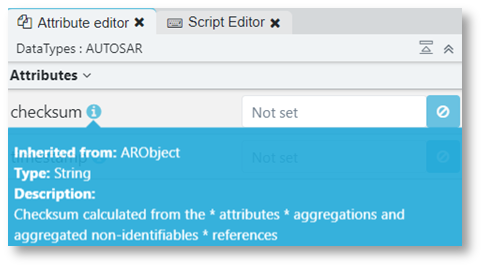
By hovering over the blue information icon next to the attribute name, an information tooltip pops up that is associated with that attribute. This pop-up box provides information about inheritance, type a brief description and for some components the possible values.
For some of the components a reference box can be found in the editor. The user can also find some additional information here (blue rectangle below). By clicking the “jump to” (red rectangle below) a jump is performed to the reference. Furthermore, the path to the reference can be copied by the copy icon (green rectangle below).
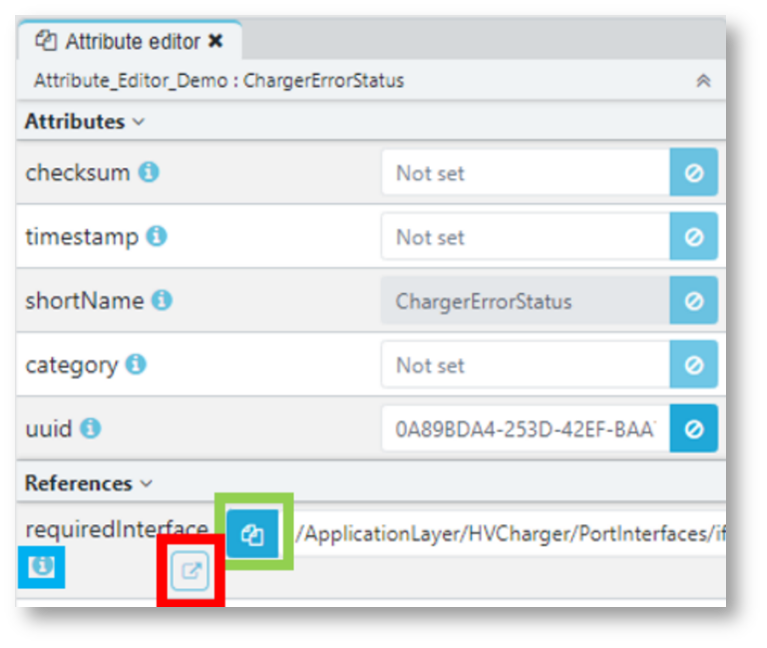
With the double arrows the unset valued can be toggled to be visible. With the singular arrow in the Reference box, its content can be toggled to be visible.
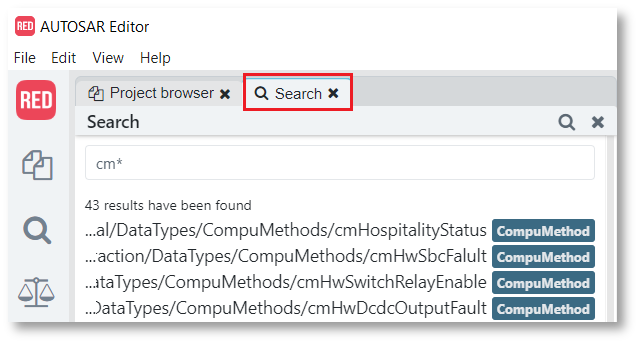
Search
Overview
The search option offers a convenient way of searching in the AUTOSAR model. RED introduces its own query language called RED Query Language, which makes it possible to filter using a wide variety of conditions.
RED Query Language
RED-QL is a query language designed to make object searches easy.
Operators
- Parentheses around blocks are possible (they can override the precedence of the expressions)
- The user can use AND (or &, &&) and OR (or |, | |) operators between any conditions
- XOR and NOT operators are not supported
- Conditions are evaluated from left to right
Property condition (matcher)
Format: KEY: VALUE, KEY = VALUE or KEY IS VALUE
- Both colon “:” and equals sign “=” can be used
- Possible keys: type, shortName, path, (id)
- Id matchers are only for debugging purposes
Path condition (matcher)
Format: [/] <short-name> [ /<short-name> …] [*]
- Absolute path starts with a “/”
- A wildcard * character can be used in the end of the shortName path to select all nodes below the specified path
- The wildcard * is only available for absolute paths
Examples:
- *: All results
- ECU: The ECU node somewhere in the graph
- /ECU: The ECU node below the root
- ethECU/ cp: The cp node somewhere in the graph below ethEcu
- /PDU/*: All nodes below /PDU
- Not supported: cp/*: All nodes below any cp (which is somewhere in the graph)
Matcher patterns
Searching for parts of the values is also supported. Use the wildcard * character at the beginning or end of the value.
- Equals: KEYWORD (The property is equal to the given keyword)
- Starts with: KEYWORD* (The property starts with the given keyword)
- Ends with: *KEYWORD (The property ends with the given keyword)
- Contains: *KEYWORD* (The property contains the given keyword)
- Anything: * (Set of all objects)
- Referable: @ (Set of all referables)
- Regex: Use ~:, ~= or matches instead of :, = or is
NOTE: Regular expressions and contains filters do not use special indexing, hence using it without other filters can make it really slow.
Query examples
| Query | Meaning |
|---|---|
| * | All the objects |
| @ | All the referables |
| /ECU/ethEcu/* | All the objects below /ECU/ethEcu |
| ethEcu/cp | All the referable objects with relative shortName path ethEcu/cp |
| type: CompuScales | All the CompuScales |
| type: CanEcu OR type=FlexrayEcu OR shortName: *Ecu* OR shortName: *Pdu* | All the CanEcus and FlexrayEcus and every referable with Ecu or Pdu somewhere in their names |
| (/ECU/* AND shortName: *myEcu*) OR (/PDU/* AND shortName: *pdu* AND type: ARPackage) | Every object below /ECU with myEcu in their names and every ARPackage below /PDU with pdu in their names |
| *Pdu OR /Cluster/* | Every object with name “…pdu” and every object below /Cluster |
| type: *Ecu AND shortName: *CAN* | Every object which has type “…ecu” and has “CAN” in their shortNames |
| shortname~: ^[Ii]?Pdu$ | All the referables where the shortName matches the given regex pattern |
| /ECU/* AND @ | All the Referables below /ECU |
| *ecu* | All the Referables with ecu in their names |
All possible condition types
| Name | Example |
|---|---|
| Everything | * |
| EveryReferable | @ |
| ShortNameEquals | shortName: FullName |
| ShortNameStartsWIth | shortName: NamePart* |
| ShortNameEndsWith | shortName: *NamePart |
| ShortNameContains | shortName: *NamePart* |
| ShortNameRegex | shortName~: NamePattern |
| TypeEquals | type: FullType |
| TypeStartsWith | type: TypePart* |
| TypeEndsWith | type: *TypePart |
| TypeContains | type: *TypePart* |
| TypeRegex | type~: TypePattern |
| AbsoluteShortNamePath | /path/to/object |
| AbsoluteShortNamePathBFS | /path/to/object/below/* |
| RelativeShortNamePath | to/object/somewhere |
| TypeHasRole | hasRole: RoleName |
| SubTypeOf | subTypeOf: FullType |
| IdEquals | id: 42 |
Notes
- The queries are not case-sensitive except for regex patterns.
- NOT SUPPORTED AFTER VERSION 1.12.0: Spaces can be escaped by the \ (backslash then space) sequence.
- NOT SUPPORTED AFTER VERSION 1.12.0: You can use \ (and \ ) to escape parentheses and \ | to escape vertical bar (can be useful for regex matchers) INSTEAD USE: String block for values, such as: shortName ~= ‘(X_) ? [A-Za-z] * / xxx’
- See Pattern (Java SE 11 & JDK 11 ) (oracle.com) for further regex documentation.
- Id generation is not guaranteed to be deterministic and might change over time. Avoid using id matcher in production.
Limitations
It is not guaranteed that the result of the same query will be the same if the given limit is smaller than all the possible results.
Definition of RED QL in regular expression form
AND := (&|&&|and)                   // any of: &, &&, and
OR := (\||\|\||or)                  // any of: |, ||, or
IS := (:|=|is)                      // any of: :, =, is
MATCHES := (~:|~=|matches)          // any of: ~:, ~=, matches
KEY := (shortName|path|type|id|hasRole|subTypeOf)
VALUE := [^=~:()&|]+                // at least one character long string that does not contain =, ~, :, (, ), &, | SHORT_NAME_VALUE := [a-zA-Z][a-zA-Z0-9_]* // at least one character long string that does not contain =, ~, :, (,), &, |,/
PATH_VALUE := VALUE
OPERATOR := (IS|MATCHES)        // conditional operator
LOGICAL_OPERATOR := (AND|OR)    // logical operator
MATCHER := KEY OPERATOR VALUE
MATCHER := \*
MATCHER := @
MATCHER := ((shortName OPERATOR)|ε) SHORT_NAME_VALUE // if (KEY OPERATOR) not present, a virtual one is inserted
MATCHER := ((path OPERATOR)|ε) PATH_VALUE // if (KEY OPERATOR) not present, a virtual one is inserted
PART := (MATCHER|COMPOSITE)
COMPOSITE := PART (LOGICAL_OPERATOR PART)*
RED_EL_QUERY := PART (LOGICAL_OPERATOR PART)*
Compare
A Compare option is available to create a report of differences between two elements of the same type. The base and the working elements do not have to be in the same project. Elements can either be selected by a drag and drop method or by right-clicking the element in the tree and clicking the “Select for comparison as Base” or “Select for comparison as Working” in the dropdown menu as shown below:
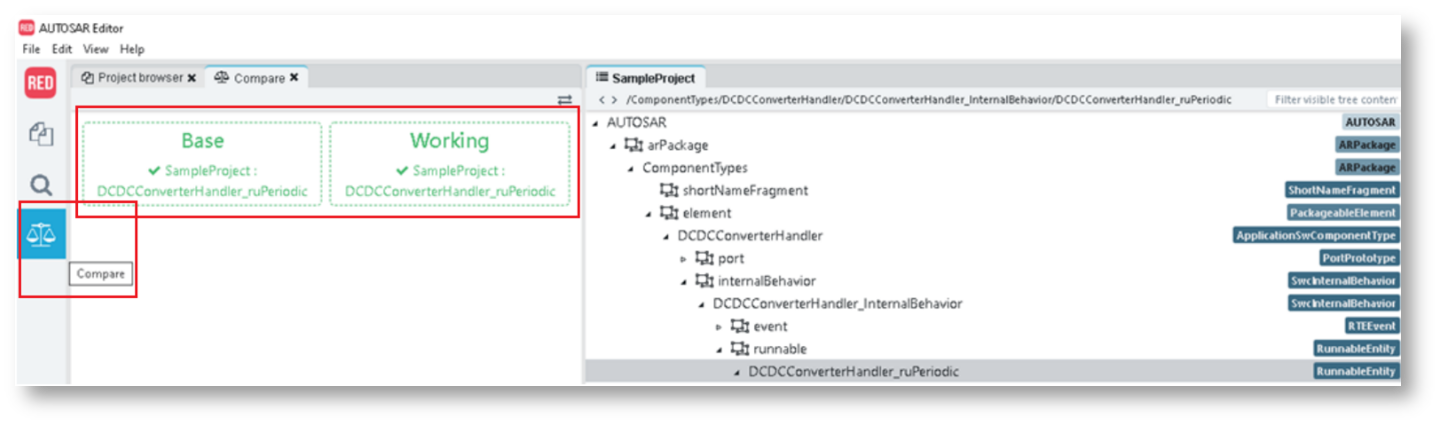
Results can be listed in Compared Tree View as tree structure:

Also, as a list by clicking the ![]() button as shown:
button as shown:

The selected element differences are listed under the “Compared Attributes” tab. Selected element attributes can be opened via the “Jump to…” in both compared project:

Merge
Selected attributes from compare view can be added to the merging tree. It can either be done individually by right-clicking and choosing the “Add to merge tree” option, or collectively, by choosing the “Add all elements to merge tree” option. Added elements will be removed from Compared Tree View.

Merge tree with individually added elements:

Base project can be updated with added element based on working project with the merge button. Unnecessary elements can be unstaged, these will appear again in the Compared Tree View.
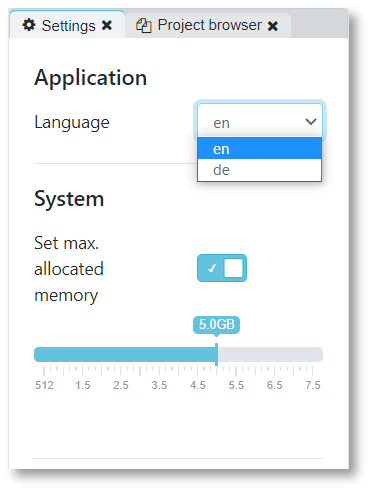
Settings
The following options are available in the Settings menu:
- Language
List of currently supported languages:
- English (en)
- German (de)
- Max. allocated memory
- When this option is enabled, the given value specifies the maximum amount of memory that can be allocated by the RED backend.
Change History
The Editor keeps track of the changes having been made to the model. These changes are listed under the Change History menu. The changes can also be undone and redone with the help of CTRL+Z (undo) and CTRL+Y (redo) shortcut keys.

Scripting
RED Editor comes with the capability of running Groovy scripts on models and tree elements in order to speed up manual workflows, generate reports and automate tasks.
Example of what the scripting interface looks like:
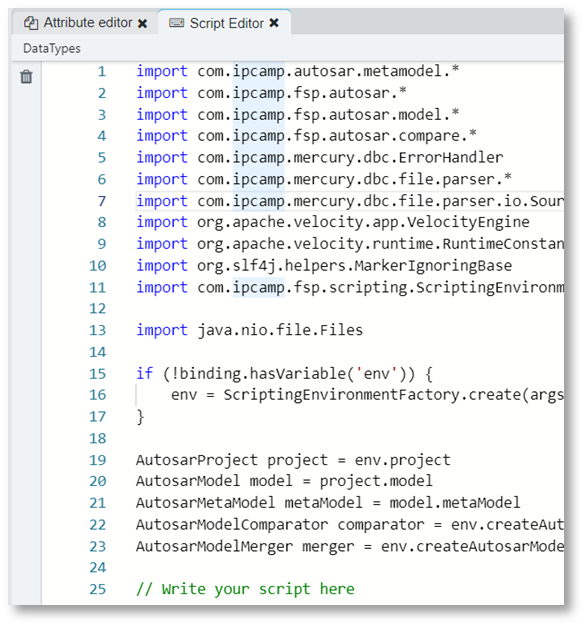
Script Editor
RED Editor comes with a built-in scripting interface that can be used to modify the AUTOSAR model procedurally with the help of only a few lines of code.
The programming language used for scripting is Apache Groovy, a Java-syntax-compatible, object-oriented programming language for the Java platform.
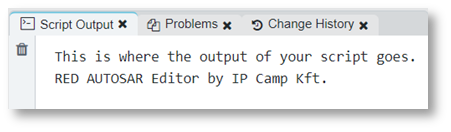
Script Output
The output of the script can be found under the “Script Output” view:
Injections
An environment is injected as a context of a script as variable env of type ScriptingEnvironment. This is for basic functionalities such as logging or sending error report. And it offers the following references:
-
- project: AutosarProject - Reference to the project currently open and active in the Editor.
- selectedObject: Optional<AutosarObject>
- Reference to the object currently selected in the tree.
- arguments: only in command line mode
Project and the selected object are available via the env. See its Javadoc for details.
Differences
| Running environment | project | autosarObject | arguments |
|---|---|---|---|
| RED Script Editor | The project for which the Script Editor widget is open (for which the Tree View is visible) | The root object | No arguments (empty array) |
| Right-click menu on an element in the Tree View | The active project (which is visible in the Tree View) | The selected object | No arguments |
| Command line scripting | A project that is initialized with argument -f file1.arxml, file2. arxml, … |
An object that is selected with argument -o /path/to/object |
Arguments that are given with -a “arg1, arg2 …” |
| IntelliJ IDEA project | A project that is initialized with argument -f file1.arxml, file2. arxml, … |
An object that is selected with argument -o /path/to/object |
Arguments that are given with -a “arg1, arg2 …” |
Model Access Interface
The Model Access Interface is the interface that is provided for the scripting environment by the backend. See Javadoc for the relevant documentation.
Script Examples
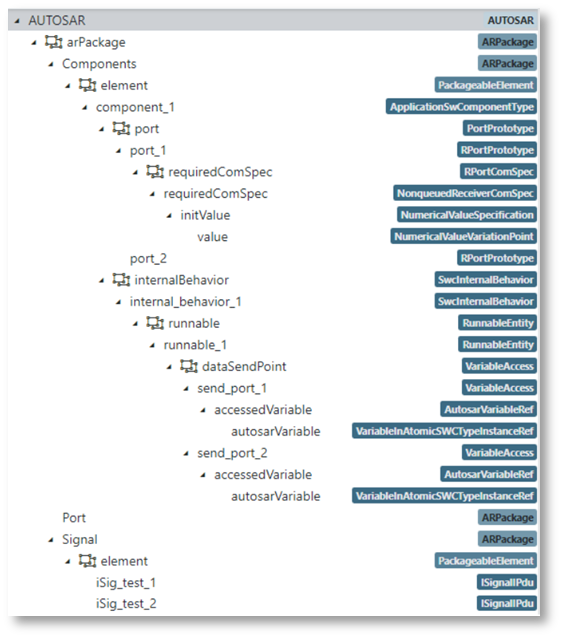
Example model
The example scripts are run and executed on the following model:
Example #1
Set “unusedBitPattern” attribute value to 1 of every type:ISignalIPdu which has a shortName that matches the given pattern “iSig_test_*”.
project.model.search("type=ISignalIPdu & shortName: iSig_test_*", 200)
    .forEach { AutosarObject iSigPdu ->

    iSigIPdu.setAttributeValue("unusedbitpattern", "1");

    def shortName = iSigIPdu.getAttributeValue("shortName").get()
    env.log ("Attribute value 'unusedBitPattern' of ISignalIPdu '" +
    shortName + "'has been set to 1.")
    }
Script output of Example #1:

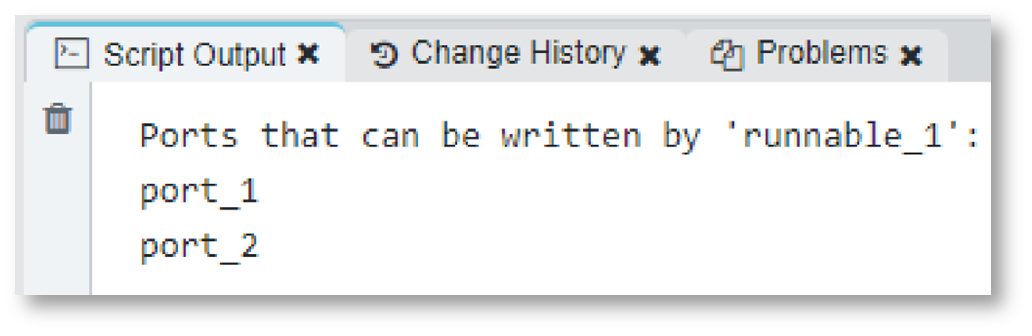
Example #2
Collect all the ports that can be written by Runnable ‘runnable_1’.
def ports = []
project.model.getObjectByShortNamePath(
        \"/Components/component_1/internal_behavior_1/runnable_1").get()
    .getContainments("dataSendPoint").forEach {AutosarObject varAccess ->
    try {
        ports.add(
                varAccess.getContainment("accessedVariable").get()
                        .getContainment("autosarVariable").get()
                        .getReference("portPrototype").get().resolve().get()
        )
    } catch(Exception e) {
        // variableAccess does not have accessedVariable or autosarVariable
        // or the autosarVariable does not refer to a portPrototype
    }
}
env.log "Ports that can be written by 'runnable_1':"
ports.forEach {
    env.log it.getAttributeValue("shortName").get()
}
Script output of Example #2:
Example #3
Reading content from MixedString:
def port1 = project.model.getObjectByShortNamePath("/Components/component_1/port_1")
.get()
// The following statement assumes that port1 contains
// a requiredComSpec object with initValue that has a value.
def initValue = port1.getContainments("requiredComSpec")[0]
.getContainment("initValue").get()
.getContainment("value").get() // value object is a
MixedString
// get the first (and only) element of the MixedString
which holds
// the value of the initValue object
.getMixedContentHandler().getPlaceholders()[0]
.getMixedStringContent()
.toInteger()
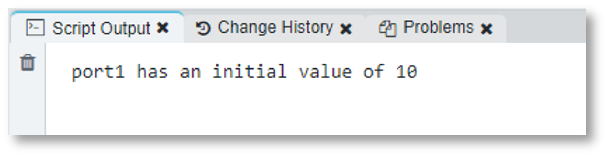
env.log "port1 has an initial value of " + initValue.toString()
Script output of Example #3:
Examples from integration tests
These examples are run as integration tests in Jenkins during each build of RED backend.
Class that is used in multiple of the following examples
import com.ipcamp.fsp.autosar.model.ReferableAutosarObject
class Signal {

    private ReferableAutosarObject wrapped;

    Signal(ReferableAutosarObject signal) {
        wrapped = signal
    }
    String getName() {
        wrapped.shortName
    }
    String getType() {
        wrapped.getContainments("physicalProps").stream()
                .flatMap { it.getContainments("swDataDefPropsConditional").stream() }
                .flatMap { it.getReferencePaths("baseType").stream() }
                .findFirst().orElse("not defined")
    }
}
Logging
import com.ipcamp.fsp.scripting.ScriptingEnvironmentFactory

if (!binding.hasVariable('env')) {
    env = ScriptingEnvironmentFactory.create(args)
}
env.log "message"
env.log new Object() {
    @Override
    String toString() {
        return "object";
    }
}
try {
    throw new RuntimeException("throwable");
} catch (RuntimeException e) {
    env.log e
}
env.error "errorMessage"
env.error new Object() {
    @Override
    String toString() {
        return "errorObject";
    }
}
try {
    throw new RuntimeException("errorThrowable");
} catch (RuntimeException e) {
    env.error e
}
Creating model
import com.ipcamp.autosar.metamodel.AutosarVersion
import com.ipcamp.fsp.autosar.AutosarFilePath
import com.ipcamp.fsp.autosar.AutosarProject
import com.ipcamp.fsp.scripting.ScriptingEnvironmentFactory

if (!binding.hasVariable('env')) {
    env = ScriptingEnvironmentFactory.create(args)
}

AutosarProject project = env.createAutosarProject(AutosarVersion.AUTOSAR_4_4_0)
project.createEmptyFile(AutosarFilePath.of("model.arxml"))
project.model.root.addPackage("NewPackage")
project.save()
Model modification
import com.ipcamp.fsp.autosar.AutosarFilePath
import com.ipcamp.fsp.scripting.ScriptingEnvironmentFactory

if (!binding.hasVariable('env')) {
    env = ScriptingEnvironmentFactory.create(args)
}

env.autosarObject.asReferable().setShortName(env.autosarObject.asReferable().
        shortName + "Modified")
def from = env.project.modifiedFiles().stream().findFirst().orElseThrow()
env.project.moveFile(from, AutosarFilePath.of("model.arxml"))
env.project.save()
Query model
import com.ipcamp.fsp.scripting.ScriptingEnvironmentFactory

if (!binding.hasVariable('env')) {
    env = ScriptingEnvironmentFactory.create(args)
}
env.log "Number of referables: " + env.project.model.objectsOfType(
        env.project.model.metaModel.referrableType).count()
env.log "Path of selection: " + env.autosarObject.closestShortNamePath
Relocate, duplicate, and rename
import com.ipcamp.fsp.autosar.AutosarFilePath
import com.ipcamp.fsp.scripting.ScriptingEnvironmentFactory

if (!binding.hasVariable('env')) {
    env = ScriptingEnvironmentFactory.create(args)
}

def model = env.project.model

def signalPackage = model.getObjectByShortNamePath("/Signal").orElseThrow()
def sysSigCopy = model.getObjectByShortNamePath("/Signal/NEWSysSig").orElseThrow()
    .duplicateBelow(signalPackage, "element")

sysSigCopy.relocateBelow(model.getObjectByShortNamePath("/NEWCluster").orElseThrow(),"element")

sysSigCopy.asReferable().setShortName("SysSigCopy")
signalPackage.getContainerObject().deleteContainment(signalPackage)

def from = env.project.modifiedFiles().stream().findFirst().orElseThrow()
env.project.moveFile(from, AutosarFilePath.of("tmp/model.arxml"))
env.project.save()
Creating a JSON report
import com.fasterxml.jackson.databind.ObjectMapper
import com.ipcamp.fsp.scripting.ScriptingEnvironmentFactory
import org.apache.velocity.VelocityContext

if (!binding.hasVariable('env')) {
    env = ScriptingEnvironmentFactory.create(args)
}
def signals = env.project.model.objectsOfType(env.project.model.metaModel.getType(
    "SystemSignal").asAutosarClass())
    .map { new Signal(it.asReferable()) }
    .collect()

def output = env.addFileResult("report.json", "application/json")
new ObjectMapper().writeValue(output, signals)
Creating plain text report
import com.ipcamp.fsp.scripting.ScriptingEnvironmentFactory

if (!binding.hasVariable('env')) {
    env = ScriptingEnvironmentFactory.create(args)
}

def report = new PrintWriter(env.addFileResult("report.txt", "text/plain"))
env.autosarObject.attributes.forEach{report.println(it.name + "=" + it.value)}
report.close()
Creating report with velocity template
import com.ipcamp.fsp.scripting.ScriptingEnvironmentFactory
import org.apache.velocity.VelocityContext
import org.apache.velocity.app.Velocity

import java.nio.file.Files

if (!binding.hasVariable('env')) {
    env = ScriptingEnvironmentFactory.create(args)
}
def signals = env.project.model.objectsOfType(env.project.model.metaModel.getType(
    "SystemSignal").asAutosarClass())
    .map { new Signal(it.asReferable()) }
    .collect()

VelocityContext context = new VelocityContext()
context.put("signals", signals)

def output = env.addFileResult("tmp/report.txt", "text/plain")
def writer = new OutputStreamWriter(output)
Velocity.evaluate(context, writer, "velocityTemplate",
    Files.readString(env.scriptDir.resolve("velocity.txt.vm")))
writer.close()
The template file:
Signals:
#foreach($signal in $signals)
$signal.getName() : $signal.getType()
#end
Compare merge
import com.ipcamp.autosar.metamodel.AutosarVersion
import com.ipcamp.fsp.autosar.AutosarFilePath
import com.ipcamp.fsp.autosar.dto.CompareState
import com.ipcamp.fsp.scripting.ScriptingEnvironmentFactory

if (!binding.hasVariable('env')) {
    env = ScriptingEnvironmentFactory.create(args)
}

def baseProject = env.createAutosarProject(AutosarVersion.AUTOSAR_4_4_0)
baseProject.createEmptyFile(AutosarFilePath.of("model.arxml"))
def baseModel = baseProject.model
baseModel.root.addPackage("basePackage")
baseModel.root.addPackage("otherPackage")

def workingProject = env.createAutosarProject(AutosarVersion.AUTOSAR_4_4_0)
def workingModel = workingProject.model
workingModel.root.addPackage("workingPackage")
workingModel.root.addPackage("otherPackage")
workingModel.root.addPackage("otherPackageNotToMerge")

def compareRoot = env.createAutosarModelComparator().compare(workingModel,
        workingModel.root, baseModel, baseModel.root)
env.createAutosarModelMerger().merge(baseProject, compareRoot, {
    it.compareState != CompareState.NEW ||
    !it.working.isReferable() ||
    !it.working.asReferable().shortName.contains("NotToMerge")
})

baseProject.save()
Read from DBC file
import com.ipcamp.mercury.dbc.ErrorHandler
import com.ipcamp.mercury.dbc.file.parser.DbcFileFactory
import com.ipcamp.mercury.dbc.file.parser.DbcFileFactoryImpl
import com.ipcamp.mercury.dbc.file.parser.io.SourcePosition
import com.ipcamp.fsp.scripting.ScriptingEnvironmentFactory

if (!binding.hasVariable('env')) { env = ScriptingEnvironmentFactory.create(args) }

DbcFileFactory dbcFileFactory = new DbcFileFactoryImpl()
ErrorHandler errorHandler = new ErrorHandler() {
    @Override
    void warn(SourcePosition sourcePosition, String s) {
        env.log "DBC WARN : in '" + sourcePosition.fileName +
                "' at [line:column] [" + sourcePosition.line + ":" +
                sourcePosition.column + "] : " + s
    }
    @Override
    void error(SourcePosition sourcePosition, String s) {
        env.log "DBC ERROR : in '" + sourcePosition.fileName +
                "' at [line:column] [" + sourcePosition.line + ":" +
                sourcePosition.column + "] : " + s
    }
}

dbcFileFactory.fromFile(
        "../../app/editor/src/test/resources/integration/AES_1.4.dbc",
        errorHandler).elements.stream()
        .map { it.toString() }
        .forEach { env.log it }
Running Scripts on a Tree Element
RED has a scripts folder created automatically at the following locations:
Mac: ~/Library/Application\Support/RED/scripts
Windows: C:\Users\{name}\AppData\Roaming\RED\scripts
This scripts folder contains the scripts that are offered in the right click menu in tree view:
Each script is in its own folder with all its groovy files and resources, and a descriptor file metadata.json. RED automatically creates a default_red_script folder with an example script and descriptor file. There’s a README.txt that describes the descriptor file content. Shared script resources and class groovy files can be symlinked to where needed. Folders that do not contain a metadata.json are not offered in the right-click menu. So, for example to hide the default script from the menu and prevent RED to create that, just delete the default_red_script/metadata.json file, and keep the folder containing it.
There are built-in scripts, that can also be triggered from the tree-view. These are the following:
Signal analysis graph
This is a graph that shows a SystemSignal's appearance in the system, including all the ISignals frames and PDUs where the actual SystemSignal is triggered/mapped. The graph shows all the buses (CAN, VLAN, etc.) where it appears, and all the ECUs that send and receive it. To see this graph for a SystemSignal, do the followings:
- Open a system model
- Search for a SystemSignal
- Right click on it in the tree view
- Select "Run script on tree element"
- From the pop-up list, select "Signal analysis graph"
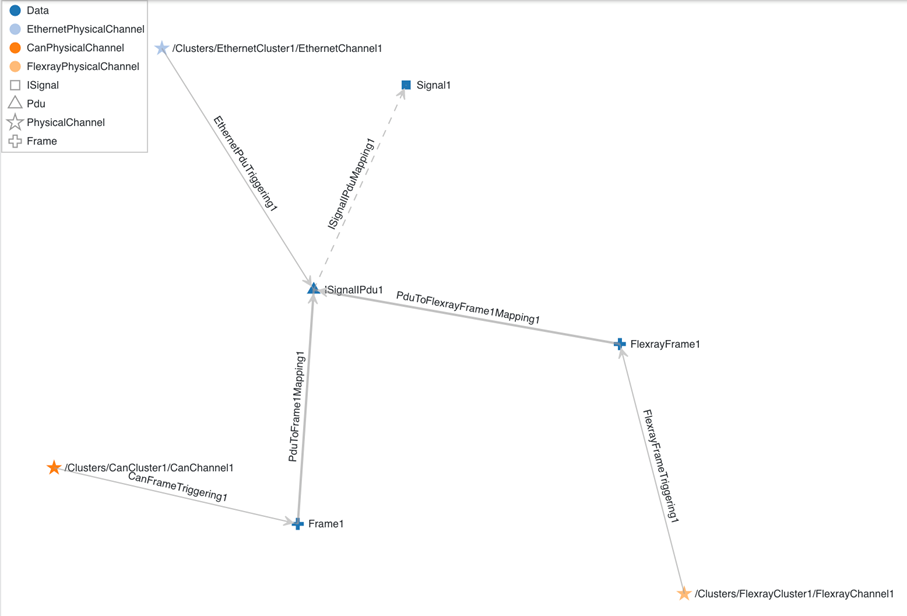
Figure : Signal analysis graph example
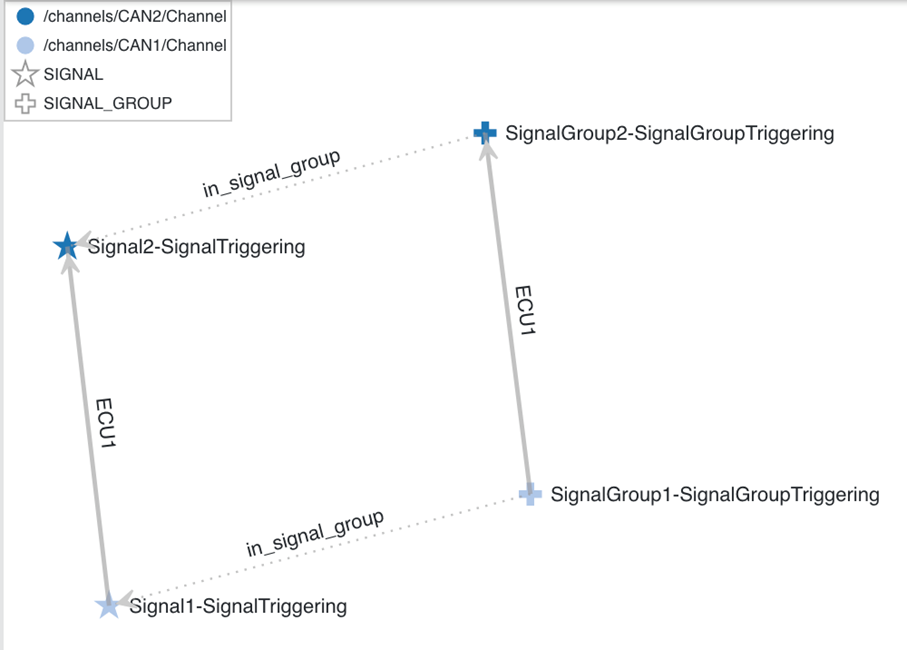
Routing graph
This is a graph that shows how ISignals, frames or PDUs are traveling from one bus to an other. This is based on the routing information modeled by Gateways. To see this graph for an ISignal, Frame or PDU:
- Open a system model
- Search for an element of the possible types above.
- Right click on it in the tree view
- Select "Run script on tree element"
- From the pop-up list, select "Signal routing"
Command Line Scripting
The scripting portion of RED is not only available from its Script Editor, but it can also be accessed via its Command Line Interface. With the help of this feature the user can automate tasks to an even greater degree, for example, in continuous integration use cases.
The scripting environment is exactly the same as in the previous, graphical interface, but the backend can be run headless to perform scripts. The scripting interface can be accessed with the command line scripting jar.
The argument --script=path/to/script.groovy (or -s) can be used to provide the script to be ran, and --args <arg> <arg>… can be used to pass arguments to the script as arguments.
The Model Access Interface can be used here as usual
An example usage:
java -jar app/command-line-scripting/build/libs/command-line-scripting.jar
    -s=app/command-line-scripting/src/main/scripts/countReferables.groovy
    --args lib/parser/src/test/resources/integration/blank.arxml
    lib/parser/src/test/resources/integration/add_test.arxml
Also, if the model to parse is huge java -jar -Xmx8g ... can be used to give more memory to the jvm.
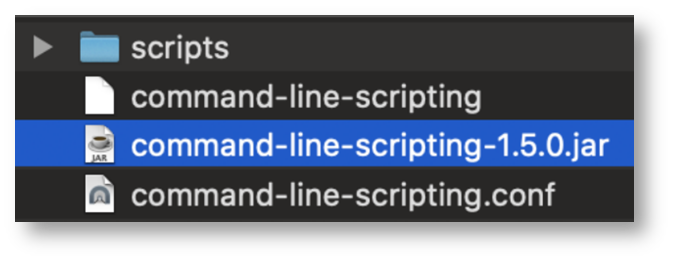
Using the distribution packages
Scripting can be used via the packaged startup scripts that pull configuration from a config file. An example after creating the distribution packages and extracting one of them in place:
cp path/to/license.lic app/command-line-scripting/build/distributions/license.lic ;
chmod +x app/command-line-scripting/build/distributions/command-line-scripting ;

app/command-line-scripting/build/distributions/command-line-scripting countReferables
    lib/parser/src/test/resources/integration/reference_test.arxml
    lib/parser/src/test/resources/integration/everything4.3.1.arxml ;
Logging
Logging is done by Log4j2. The log messages initiated from script are passed to the console output and the log of the scripting environment is passed to a file WORKING_DIR/command-line-scripting.log. This is overridden on every run of the app. To pass the environment logs also to console set the following system property: -Dlog.env.target=CONSOLE. To have full control of the logging facility, put a Log4j2 configuration file on the classpath with proper configuration.
IntelliJ IDEA Project Setup
There is a possibility to use IDEA to develop scripts. The benefits are context help, debug option, and all the other IDEA benefits.
Steps
- First, make sure that the Groovy plugin is enabled (it is enabled by default).
- Click the New Project button in the IDEA startup window.

- Choose Groovy project
- Choose a java 11 project SDK (You may browse the location of your JDK install)
- Don’t set anything for Groovy library for now
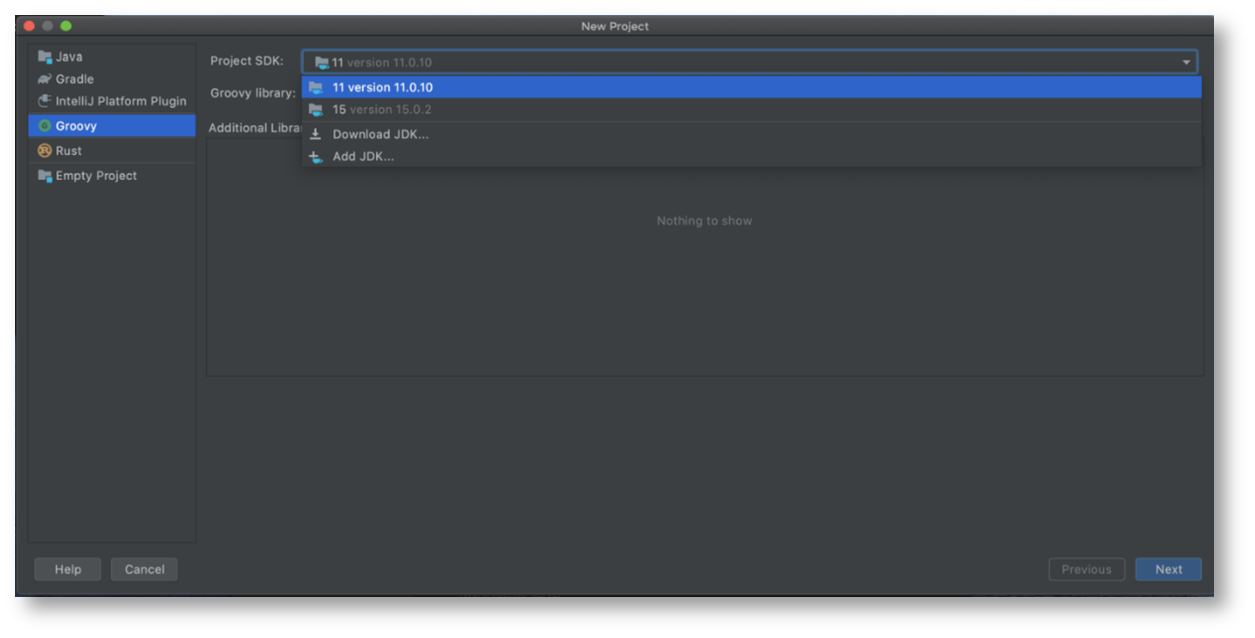
- Click Next
- Select the directory and name of your project. It may already contain some scripts

- Finish
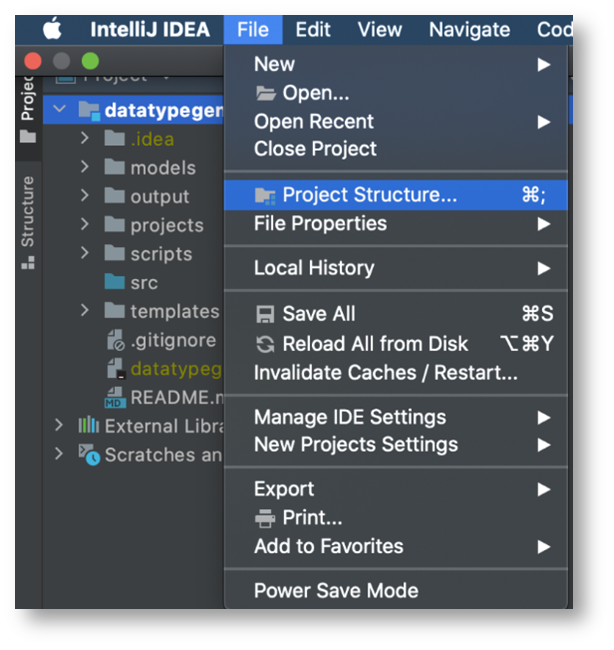
- Select Project structure menu
- Add a new Java library
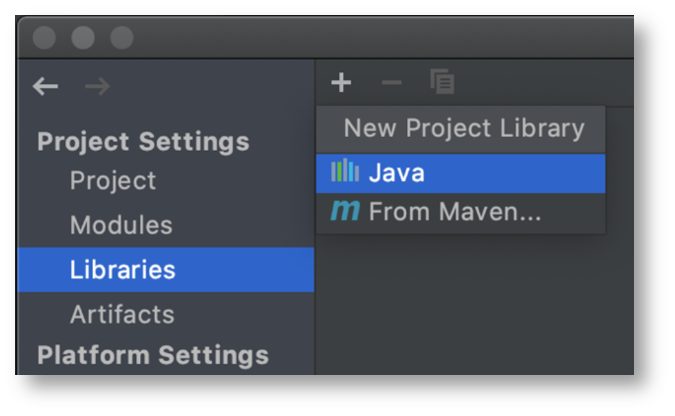
- Browse and select the jar file of your command-line-scripting directory
- Now if you open one of your scripts, the classes used in that like AutosarModel should be highlighted, context help should be available, etc.
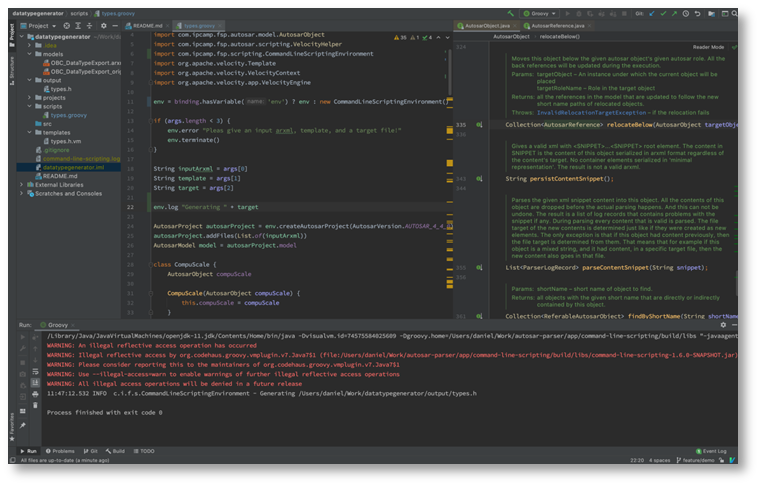
- With the following line of code, the scripting environment can be set, even when the script is run from IDEA:
import com.ipcamp.fsp.scripting.ScriptingEnvironmentFactory

if (!binding.hasVariable('env')) {
    env = ScriptingEnvironmentFactory.create(args)
}
Also, compatibility with running script in RED, or using command line is kept.
- Now create a run configuration to be able to run one of our scripts

- Give it a name, set a script path to run, and don’t forget to tick Add module classpath to the runner
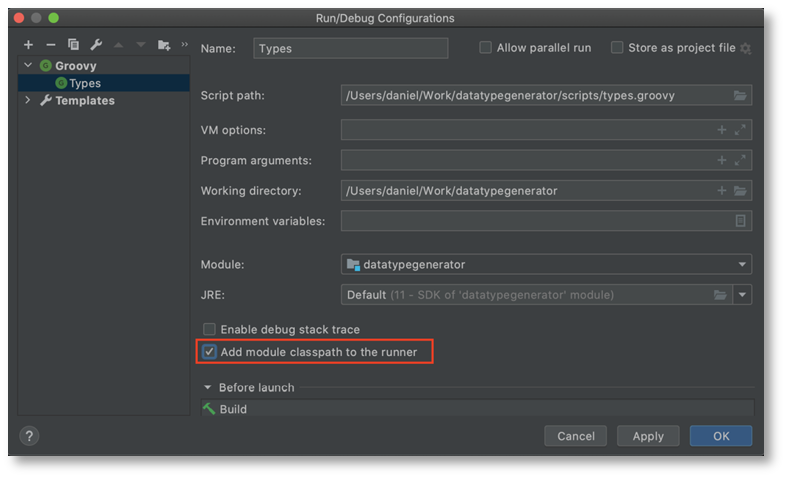
- Arguments can also be set using the run configuration, from which the license is mandatory: -l path/to/license.lic. For complete description of arguments, see the help of command-line-scripting jar.
- Now your script can be run, or even debug using this run configuration